Sunday, August 21, 2011
Friday, August 5, 2011
Thursday, August 4, 2011
Saturday, July 30, 2011
Friday, July 29, 2011
Wednesday, July 27, 2011
Monday, July 18, 2011
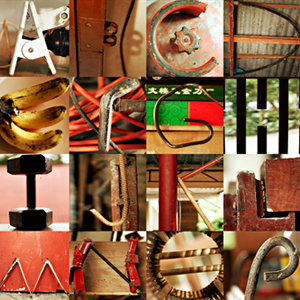
Creative challenge
Looking for something to shoot this week? Here is an idea.. find random letters or objects that look like letters and shoot the alphabet -- or, just your name or a word. It can be a bit of a challenge.
Then make them into one image with Photoshop! Example.
Then make them into one image with Photoshop! Example.
Sunday, July 17, 2011
Friday, July 15, 2011
Thursday, July 14, 2011
Wednesday, July 13, 2011
Tuesday, July 12, 2011
Mounting
Hey folks, if you want to practice mounting the last week of class (July 26 & 28), here is what you'll need:
• One or two 8x10 prints
• 11x14" foam core (3/16th inch thick)
• Optional: 11x14" (8x10" window) matte.
You can find the foam core at Hobby Lobby, a two pack of the "ghost line" is something like $6.
I might recommend Hy-Vee for your prints, although I did a Walgreens print and it worked fine.
Mounting Handout.
Monday, July 11, 2011
Thursday, July 7, 2011
Examples, fixed
Tuesday, July 5, 2011
Update
Hi all,
Tonight we did this in-class panorama practice. Here is Sara's!
If you want to do your own in thenext week July 19 (besides the practice shot tonight) you can get up to 10 points E.C.
Other than that we just edited some photos tonight and talked about how to do a quick vintage look in Camera Raw. We also looked at some examples of the "lines" assignment. Here is some inspiration.
Thursday I'll do a quick review on composition. Then we can shoot some portraits of our classmates for our books. You'll just need a photo of yourself for the inside page -- it can be serious, fun, dramatic -- we'll have some fun in the studio. (You can have someone take a photo of you with your own camera so we don't have to worry about getting the photos off another person's memory card).
We can also have time to catch up on Photoshop work AND make sure you have 20 or so photos picked out that you want to use for the book. We can get started on any re-editing that needs to be done, in addition to resizing and sharpening/brightening for print.
Andy
Tonight we did this in-class panorama practice. Here is Sara's!
If you want to do your own in the
Other than that we just edited some photos tonight and talked about how to do a quick vintage look in Camera Raw. We also looked at some examples of the "lines" assignment. Here is some inspiration.
Thursday I'll do a quick review on composition. Then we can shoot some portraits of our classmates for our books. You'll just need a photo of yourself for the inside page -- it can be serious, fun, dramatic -- we'll have some fun in the studio. (You can have someone take a photo of you with your own camera so we don't have to worry about getting the photos off another person's memory card).
We can also have time to catch up on Photoshop work AND make sure you have 20 or so photos picked out that you want to use for the book. We can get started on any re-editing that needs to be done, in addition to resizing and sharpening/brightening for print.
Andy
Monday, July 4, 2011
Tomorrow...
Hey folks.. tomorrow if the weather holds out let's go outside and shoot some panoramas.
I'll have a handout, but here is a website that describes the process if you want to practice. We'll do a practice in class and then you can do one on your own for extra credit and the book.
You'll also have some time to edit your "Seven Thirteen" and Seven Deadly Sins assignments if needed.
THURSDAY, we'll start picking out photos for the book, which must be ordered by 7/12 -- we'll have some time that day in class to work on it as well.
Friday, July 1, 2011
Challenge!

Challenge for over the weekend: Fireworks!
You'll need a tripod, and set your camera to manual.
Shutter speed: about 1 second, more or less. You'll have to experiment quickly as the fireworks go off. If you leave the shutter open for too long, you'll have too many fireworks going off and it won't look good. The above shot had a shutter of just .8 seconds.
Timing is tricky so just keep shooting.
Aperture: f/4, f/5.6 or something relatively open.
ISO: 200 or 400
Focus: Set to manual. You'll probably set it to "infinity" -- for Canon users, it's a little tricky because infinity is usually not quite all the way when you turn the focus. Look through the lens and you can try to eyeball it. Zoom in, focus, and zoom out if needed.
If you want to shoot the fireworks in Des Moines, a good spot is atop the parking garage here, just north/across the street of the Iowa Historical Building. Bring a small radio and tune into 90.1 fm to listen to the orchestra!
Saturday, June 25, 2011
One more thing I forgot to mention -- if you want to do the Reverse Lens Macro E.C., you CAN do it with one lens. You can flip your lens around and put it flush up to your camera. You have to get really close to whatever you are shooting, and have a lot of light, but you don't need two lenses back to back.
Ask me about it in class and I can show you!
Ask me about it in class and I can show you!
Wednesday, June 22, 2011
Tuesday, June 21, 2011
Hey folks.. great job working on your own with the Photoshop exercises.
Thursday we'll have a couple things going on:
1 - shoot your food shot
2 - edit your food and unusual composition shots
3 - finish any Photoshop you didn't get done today (I think everyone that was here got it done)
4 - meet with Andy to talk about your assignments again
^ Not necessarily in this order! No lecture!
Photoshop Assignments for June 21-23
These will be due at the end of class Thursday June 23, but some of you might be done with it on Tuesday if you're not shooting in the studio. We have three photos to edit!
#1: Selective Color
Selective Color is an effect for desaturating everything except certain parts of your image. We're going to use an adjustment layer with a mask, which is a very powerful concept in Photoshop and can be used to make a lot of advanced adjustments.
1. Copy this photo to your desktop.
2. Open it in regular Photoshop (you can drag it down onto the Photoshop icon in the doc or open Photoshop and go File → Open).
3. Go the the Layer Menu then New Adjustment Layer → Black and White… (and click OK)
4. Click "B" to select your brush
5. Black reveals, white conceals. Make sure the color at the bottom of the tool bar on the left is set to black.
6. Start painting the tomatoes! A couple notes:
• Make sure your brush is set to something round click on the brush picker in the upper left corner. Set the hardness to 25%.
• You can change the brush size with the bracket keys ( [ for smaller, ] for larger)
• Work goes quicker with a larger brush
• If you make a mistake, set the color to white to conceal
7. Paint so that only the tomatoes are in color. Before you are done, note that you can click on the "Black and White" adjustment layer you created (in the Layers window) to tweak the tones of your image. Try playing with it a little.
8. Save at JPEG quality 8 and upload to Flickr as Selective Color Practice.
#2. Clone Stamp
The Clone Stamp tool can be useful for removing unwanted objects. Just note that it is unethical for photojournalists to use it.
1. Save this photo to your computer. Open in regular Photoshop.
2. The ninth tool down on the left tool bar is the Clone Stamp. We'll be using it to get rid of the boat and bird so it looks like this.
3. To tell the Clone Stamp where to sample from, hold down the option key and click on the photo. Now, when you release the option key and move the mouse around, you'll see a preview of what it will look like if you start "painting." You might have to adjust the brush size with the bracket keys -> [ and ]
4. The bird will be easy. Sample some blue sky and paint over the bird. The boat will be trickier. A good starting place is sampling right on the edge of the water, then start painting in the same relative place where the boat is. Ask Andy for help if needed.
5. Save as a JPEG and upload to Flickr as No Boat!
#3. Compositing and Gradient
This one is a little tricky and gets into some advanced features of Photoshop. Compositing can be useful when you need to combine two images or take out a background and replace it with a solid color or gradient.
Apple With Gradient
1. Download this image and open in Camera Raw
2. Fix the contrast and color balance. Go to the HSL sliders tab and adjust the hue/saturation/luminance of the red slider so the apple pops. Increase the luminance and saturation of the green slider so the worm pops out more. Example.
3. Click the "Open Image" button to open in Photoshop.
4. Use the Quick Select Tool (W) to select the apple. Click and drag inside the apple until you have the "marching ants" along the edge of the apple.
5. Hit the "Refine Edge" button, middle top. Click the "Smart Radius" button. Increase the radius, smooth, and feather sliders slightly to make the cutout a little cleaner.
5. Once it is selected, copy it (Edit → Copy) and paste it into a new layer (Edit → Paste)
6. Hide the background layer by clicking on the "eyeball" next to it in the layers window
7. Go to Layers → New Fill Layer → Gradient. Click OK.
8. Change "style" to Radial and click the "Reverse" button.
9. This is a little tricky… ask Andy if you aren't sure where to pick but see this image. To change the gradient to blue, click on the color box, then and find a nice shade of blue in the color selector.
10. Click OK in windows until you're back in your workspace.
11. In your layers window on the right, drag your gradient layer below your 2nd layer so the blue gradient appears underneath the apple
12. Save as JPEG, upload to Flickr as Apple!
Monday, June 20, 2011
Part I of a 20-part (!) retrospective of World War II photos.. this week: Pre-WWII.
Also, I created a new assignment group on the right sidebar because the other one was getting a bit long and cumbersome to update in Blogger!
Also, I created a new assignment group on the right sidebar because the other one was getting a bit long and cumbersome to update in Blogger!
Sunday, June 19, 2011
Mid-Term Study Guide
Found here!
The test is June 28th and covers chapters 1-9. Keep checking as I might add to it (I'll add to the top and write "NEW").
The test is June 28th and covers chapters 1-9. Keep checking as I might add to it (I'll add to the top and write "NEW").
Saturday, June 18, 2011
Extra Credit
Extra Credit assignment... up to 15 points... due 7/7.
Three "Reverse Macro" shots. Instructions here!
Be aware that you might need a lot of light hitting whatever you are photographing.
The three shots:
1) Something living (plant/insect)
2) Something man-made
3) Something edible
Upload to Flickr, titled Macro Extra Credit.
Three "Reverse Macro" shots. Instructions here!
Be aware that you might need a lot of light hitting whatever you are photographing.
The three shots:
1) Something living (plant/insect)
2) Something man-made
3) Something edible
Upload to Flickr, titled Macro Extra Credit.
Thursday, June 16, 2011
Wednesday, June 15, 2011
Studio Lights Handout
I'll bring a hardcopy of this but here is a handout on using the studio lights.
Note that I might add more details to it (I just wrote it from memory for now!).
Note that I might add more details to it (I just wrote it from memory for now!).
Tuesday, June 14, 2011
Today's in-class practice
Part 1: Gradient Filter
1. Click here and drag to desktop.
2. Edit in Camera Raw - click over to Gradient Tool - fourth from last at the top tool bar. Use the settings seen here.
3. It should look like something like this when done. Upload to Flickr.
Part 2: Skin softening
1. Drag this image to your desktop.
2. Click over to the adjustment brush tool at the top.
3. Look at the settings in this one and "paint" her skin. Be sure to avoid her eyes and hair. If you need to remove where you have painted, click on the "Erase" option on the left near the top of the sliders.
4. To remove the red (it just shows you where you have painted) un-click the "Show Mask" button as seen here.
5. Make sure everything is 0 except clarity and sharpening, as shown in the last two examples. Upload to Flickr.
After you're done you can edit your contrast and painting with light assignments and meet with Andy for your one-on-one look at your photos.
Saturday, June 11, 2011
Friday, June 10, 2011
Adobe Bridge
If you click on the video and go to YouTube, you can find links to the follow-up segments on the right hand side. It would be worth going through if you want to see a little more on what Bridge does.
Camera Raw tips
Hi folks,
In Wisconsin but thinking about class -- I've started working on a little Camera Raw cheat sheet with some helpful links inside.
Part of the purpose of the in-class lab on Tuesday was to get you to start thinking about when a photo starts to look "good" to you. Working on your "eye" if you will. We'll continue to work on this as we go along.
I know some students like a simple equation on how to "fix" a particular image, but truth be told there is no secret formula. What you can be on the lookout for is:
• Is any part of my image over-exposed?
• Do the colors look right?
• Are the blacks strong enough, or just a dark gray?
• Is my image "sharp" enough?
• Is my horizon line straight?
• Do I have enough contrast?
• Are my colors the right amount of saturation?
• Is my image cropped strongly, taking out anything that might weaken the composition?
These are just a few questions that will go into the final product of any image, and the right answer can vary from photo to photo. I'll continue to show you the tools to fix your photos, but some of it will be up to you to work on your "eye."
Thursday, June 9, 2011
I haven't read through this whole article yet but it looks like it has some good tips for shooting in bright sunlight (some of it helps if you have lots of gear!).
Monday, June 6, 2011
Friday, June 3, 2011

Thursday, June 2, 2011
Assignment in lieu of class June 9
Here's a link to the out of class assignment that will make up for no class on June 9th. We'll do a demo in class so you get an idea how it is done.
Wednesday, June 1, 2011
Sunday, May 29, 2011
Optional challenge
Once in a while I'll post an option assignment (some will be extra credit) for those who have some extra time and would like to do some more shooting!
Here's the challenge: Photograph a plate of food, lit by natural light coming in from a window. Here is an example that I shot the other day.
You can edit at home or in class and title it Optional: Food. And link to it in the comments!
Here's the challenge: Photograph a plate of food, lit by natural light coming in from a window. Here is an example that I shot the other day.
You can edit at home or in class and title it Optional: Food. And link to it in the comments!
Wednesday, May 25, 2011
Question...
Class,
Question that you can answer in the comments... what software do you typically use to ORGANIZE your photos?
Bridge?
Lightroom?
Aperture?
iPhoto?
Something else?
Question that you can answer in the comments... what software do you typically use to ORGANIZE your photos?
Bridge?
Lightroom?
Aperture?
iPhoto?
Something else?
Tuesday, May 24, 2011
Sunday, May 22, 2011
Thursday, March 10, 2011
Subscribe to:
Comments (Atom)